
Using the Mobile Version
On a smartphone, Tacticalista opens the mobile editor, which you operate from the toolbar at the bottom of the screen. Boards are shared with the desktop version, so you can edit the same project on a computer or a smartphone. Tablets such as the iPad use the desktop editor with touch.
On a smartphone, add Tacticalista to your home screen before using it. If you keep it open in the browser, a message asking you to add it to the home screen stays at the bottom of the screen. → Use as PWA
Screen layout
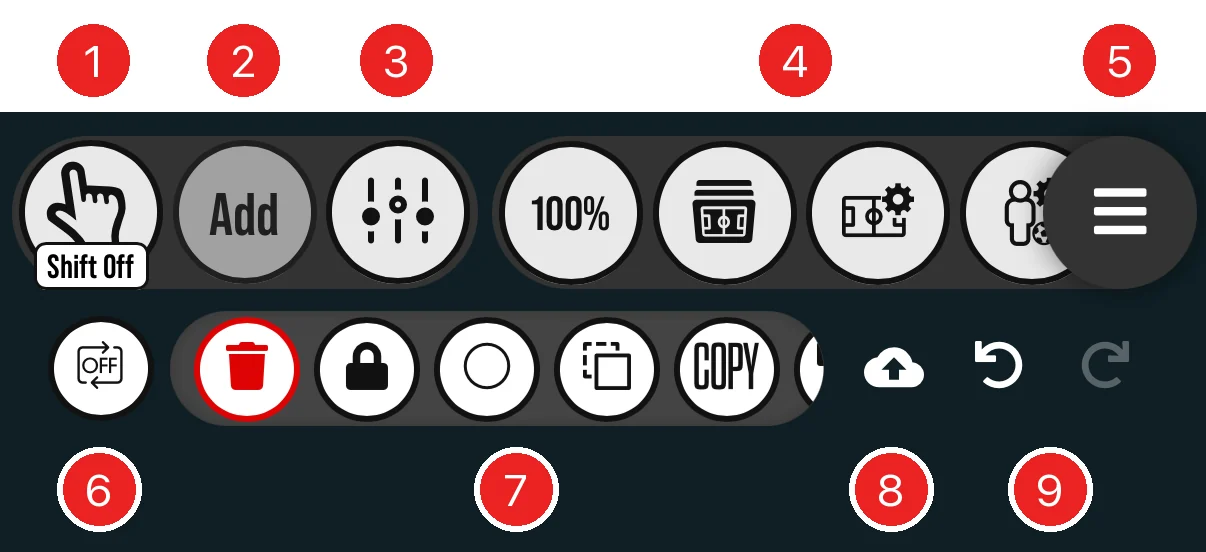
| No. | Button | Description |
|---|---|---|
| 1 | Move | Returns to the mode for selecting and moving objects. Pressing it in this mode turns Shift on or off → Selecting several objects |
| 2 | Add | Chooses an object to add → Adding objects |
| 3 | Opens the appearance settings of the selected object → Changing the appearance | |
| 4 | Setting buttons | Buttons for zoom, scenes, field settings, and more. Scroll left and right to see them all → Setting buttons |
| 5 | Opens the menu → Menu | |
| 6 | Turns repeat placement on or off. When on, you can place the same object again and again → Placing the same object repeatedly | |
| 7 | Selection actions | Buttons such as delete and lock, depending on what is selected. Scroll left and right to see them all → Actions for selected objects |
| 8 | Saves the project | |
| 9 | Undo and redo. Shown when "Use history (Undo/Redo)" is on in the menu |
Adding objects
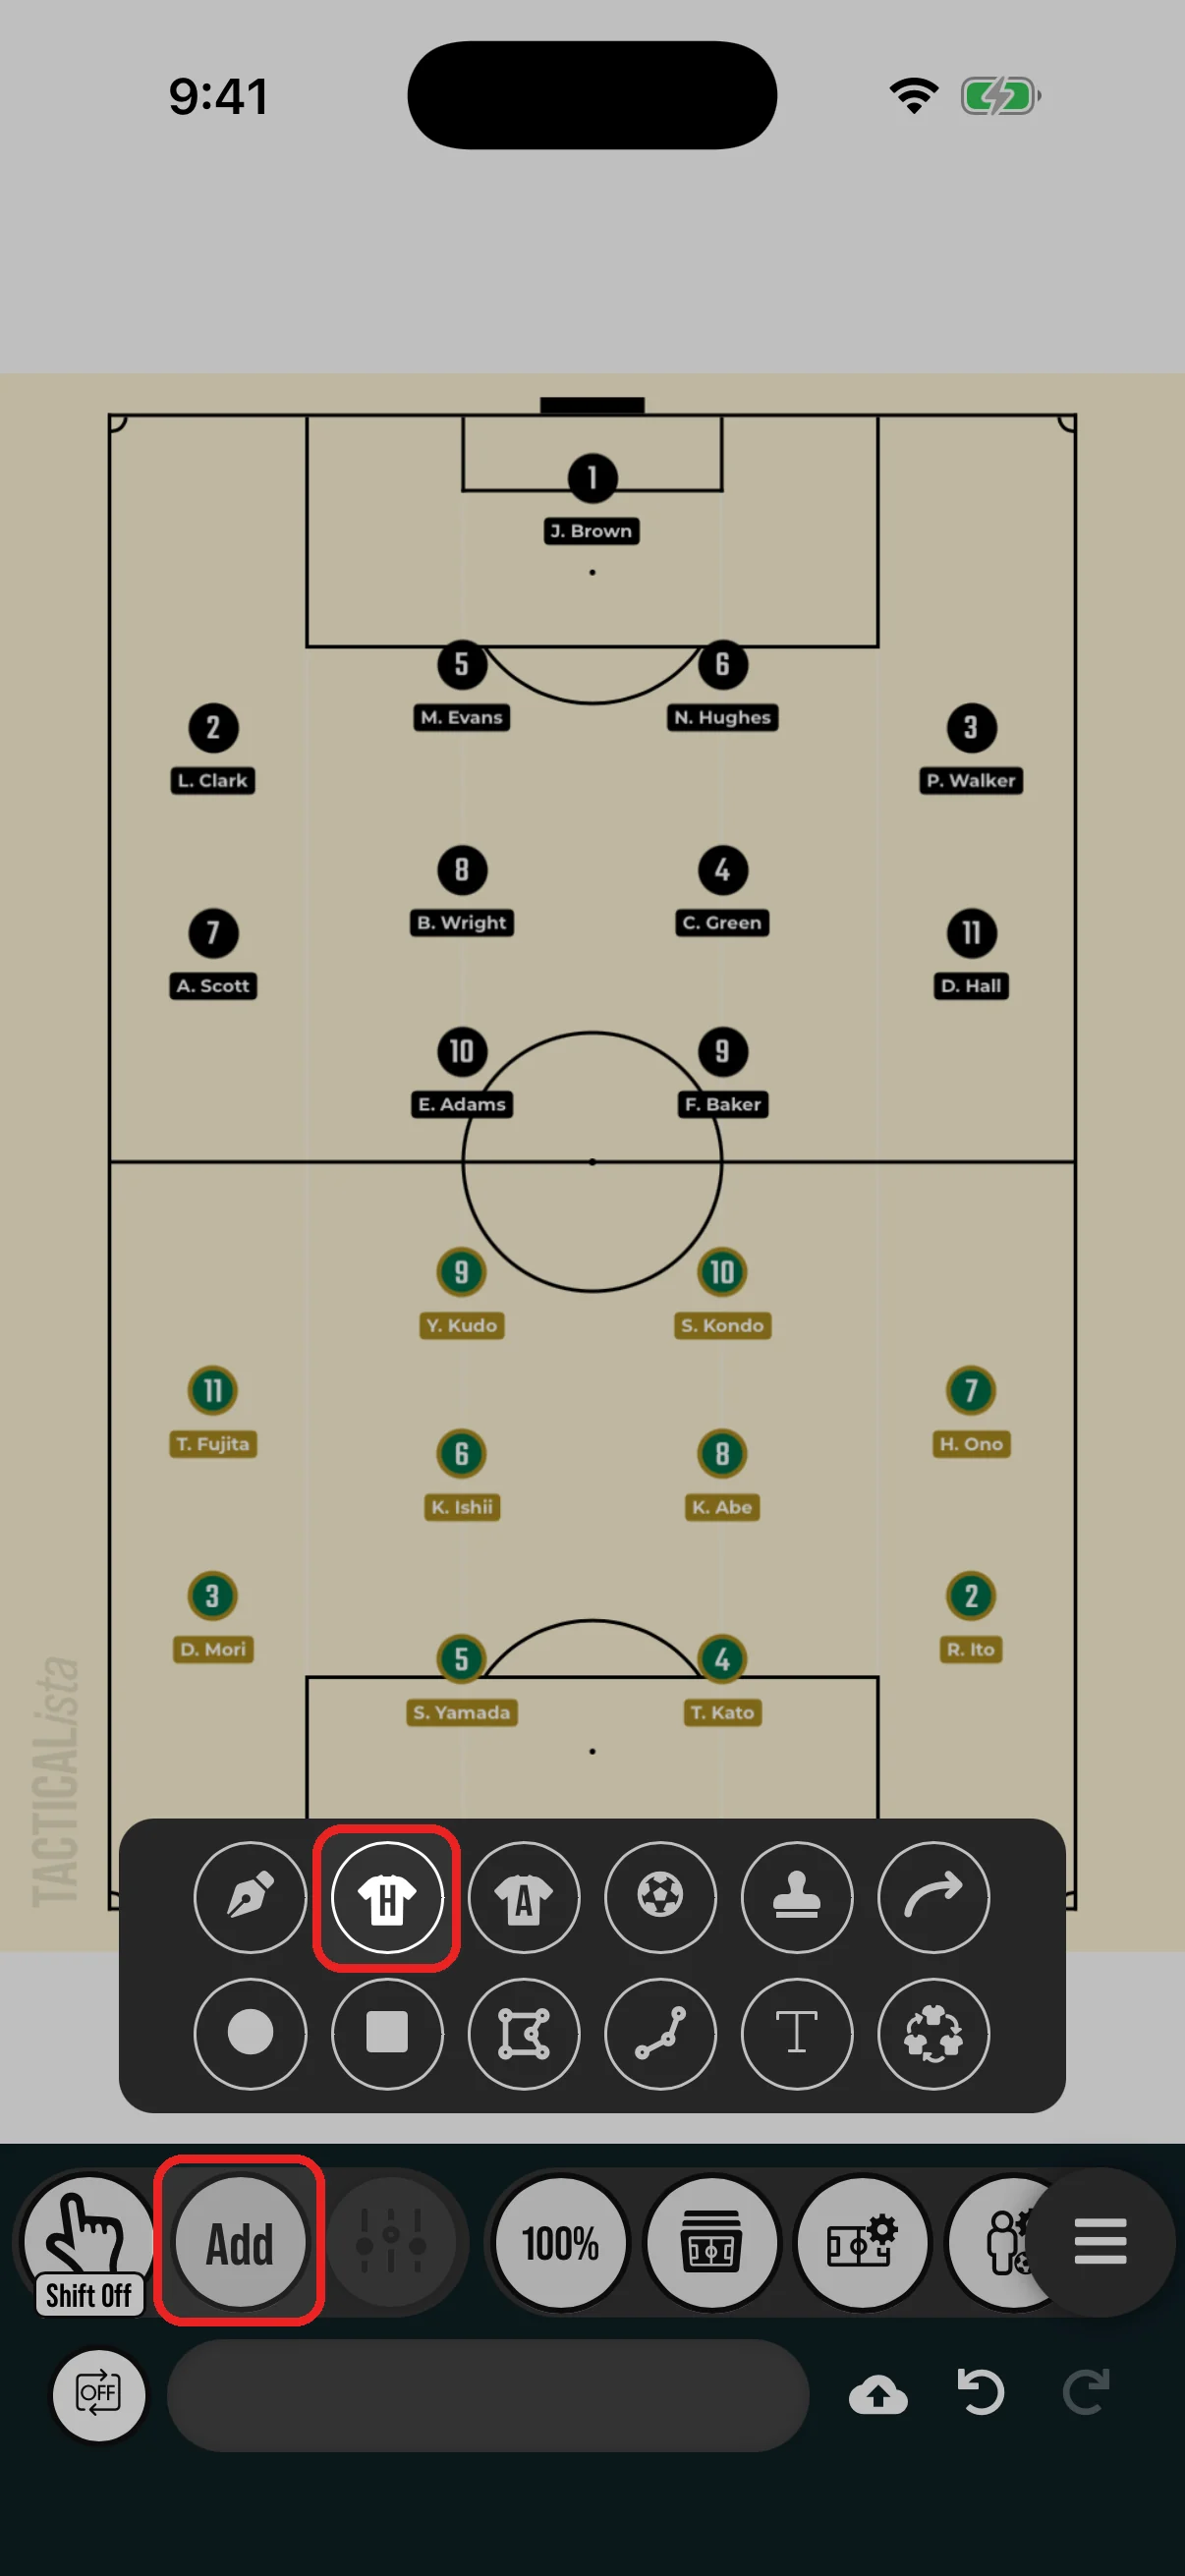
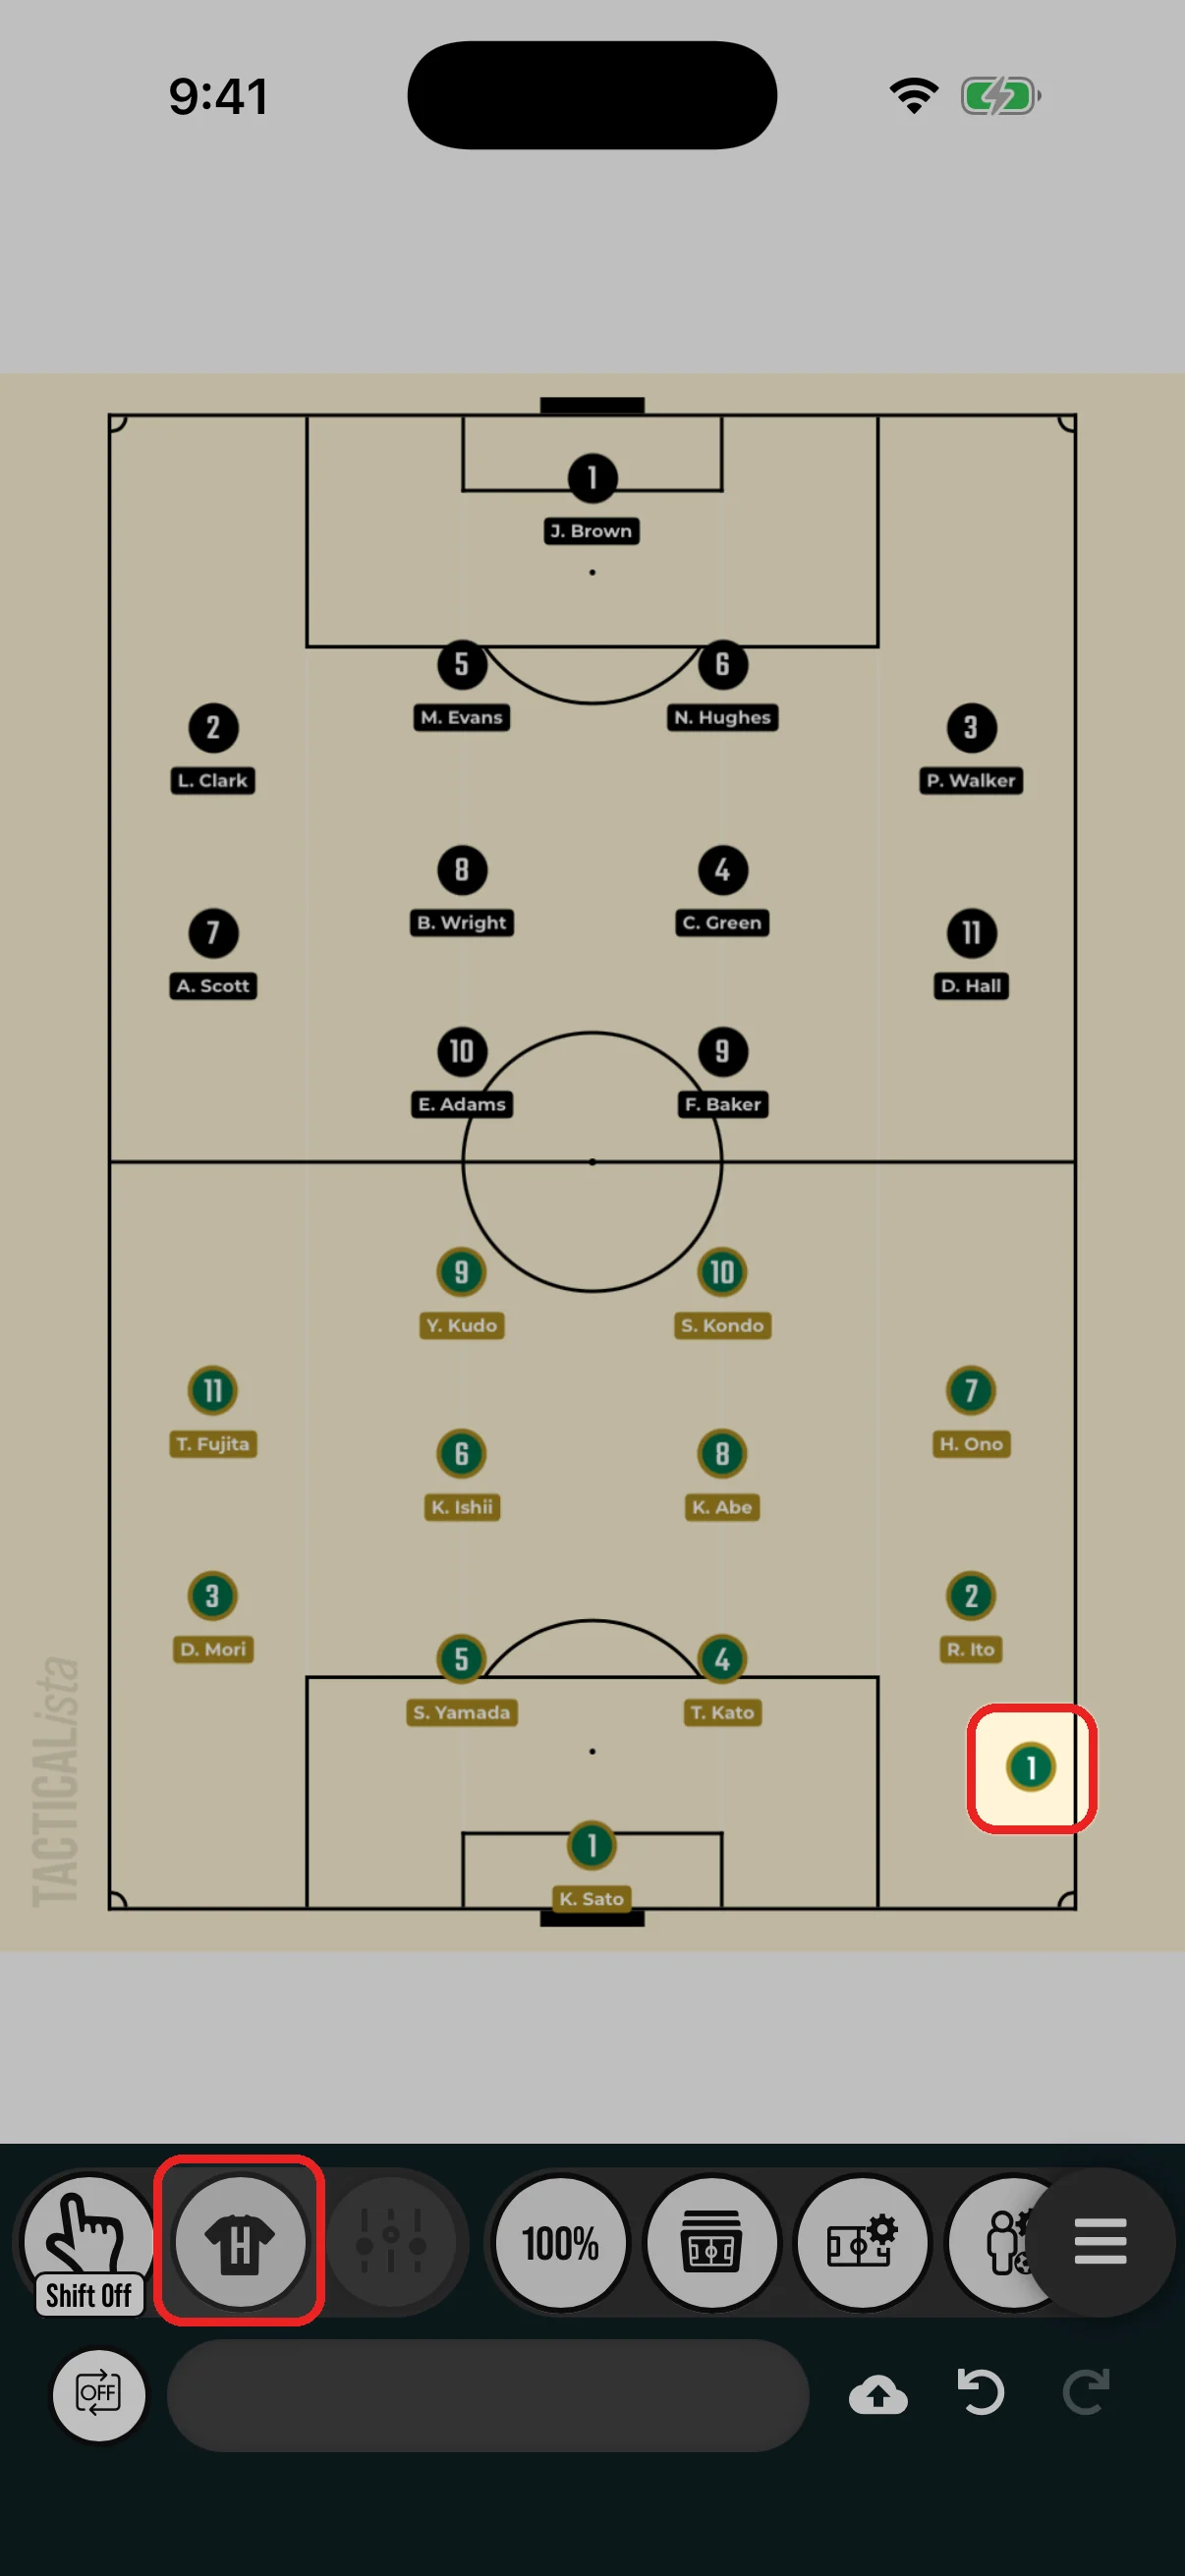
- After placing an object, the editor returns to the move mode, and "Add" changes to the icon of the tool you just used. Press it again to pick the same tool.
- Pressing "Add" while a tool is chosen opens the list of tools.
- To place the same object several times in a row, turn on .
Selecting and moving objects
Tap an object to select it, and drag it to move it. Tap an empty spot to clear the selection.
Selecting several objects
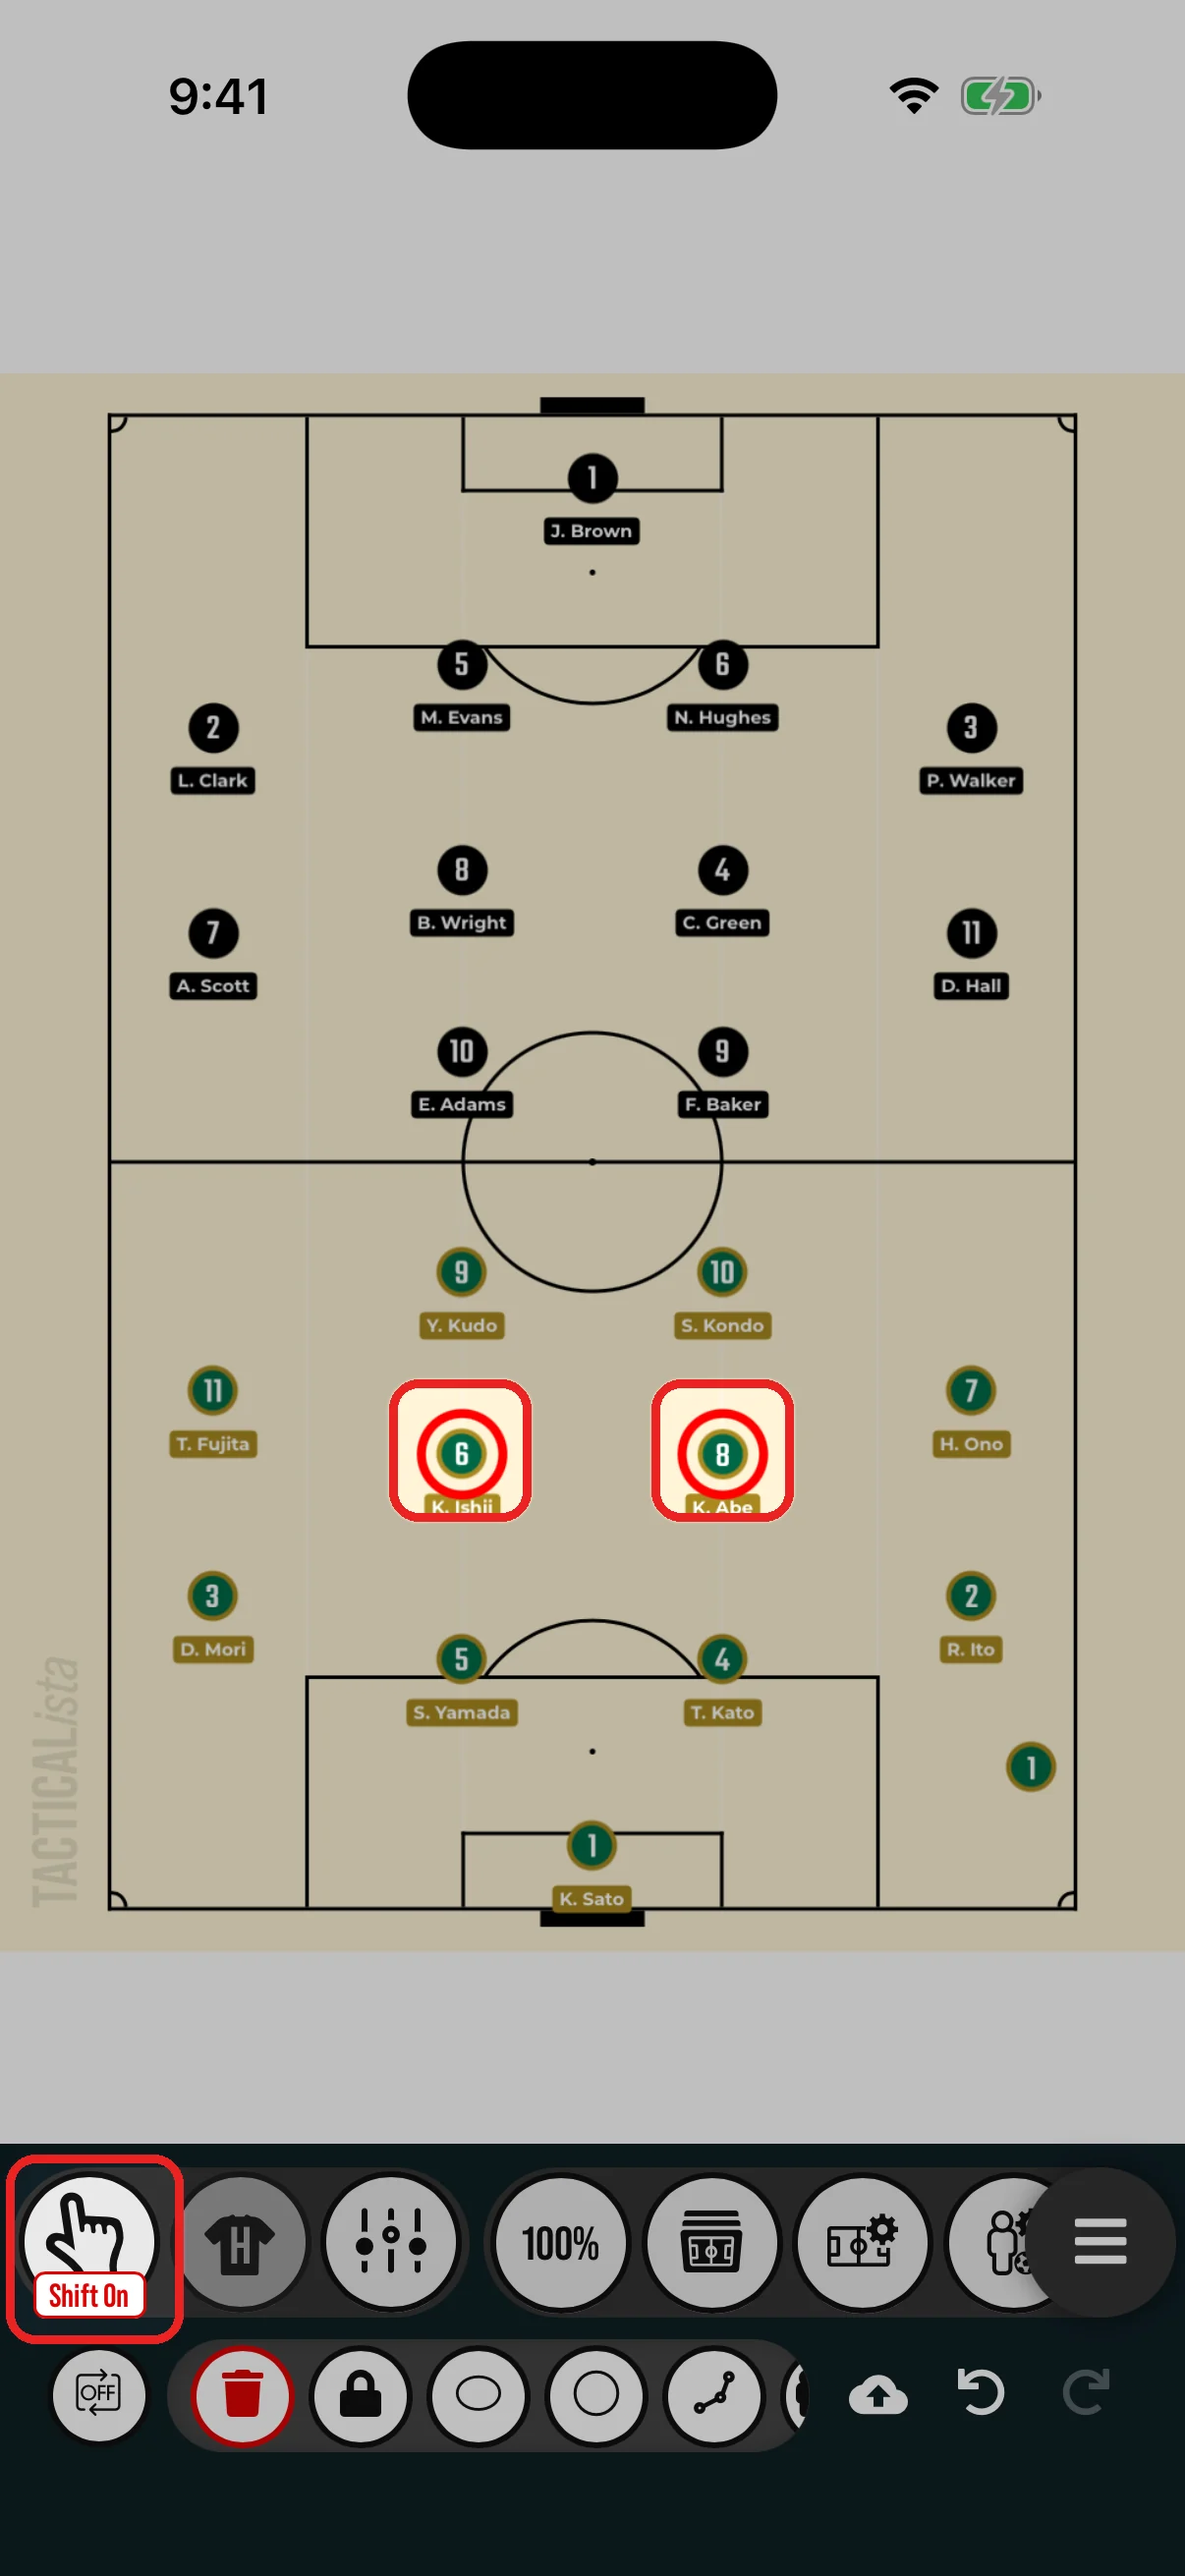
- Press the move button to switch to "Shift On".
- Tap objects one after another to add them to the selection. Tapping a selected object again removes it from the selection.
- To move them together, press the move button to switch back to "Shift Off", then drag.
Actions for selected objects
When you select objects, action buttons appear in the lower row of the toolbar.
| Button | Action | Shown when |
|---|---|---|
| Delete | ||
| Edit the text | One text object is selected | |
| / | Lock / Unlock | |
| Turn the players toward the selected ball or marker | One ball or marker is selected | |
| Surround two players with an oval | Two players are selected | |
| Place a circle behind each player | Players are selected | |
| Surround with a polygon | 3 to 11 players are selected | |
| Connect with a polyline | 2 to 11 players are selected | |
| Swap the positions of two players | Two players are selected | |
| Duplicate | ||
| Copy | ||
| Paste, or clear the copy | After copying | |
| Align | Several objects are selected | |
| Change the stacking order |
For drawing shapes, see Highlighting Players with Shapes. For aligning and the stacking order, see Basics of Objects.
Changing the appearance
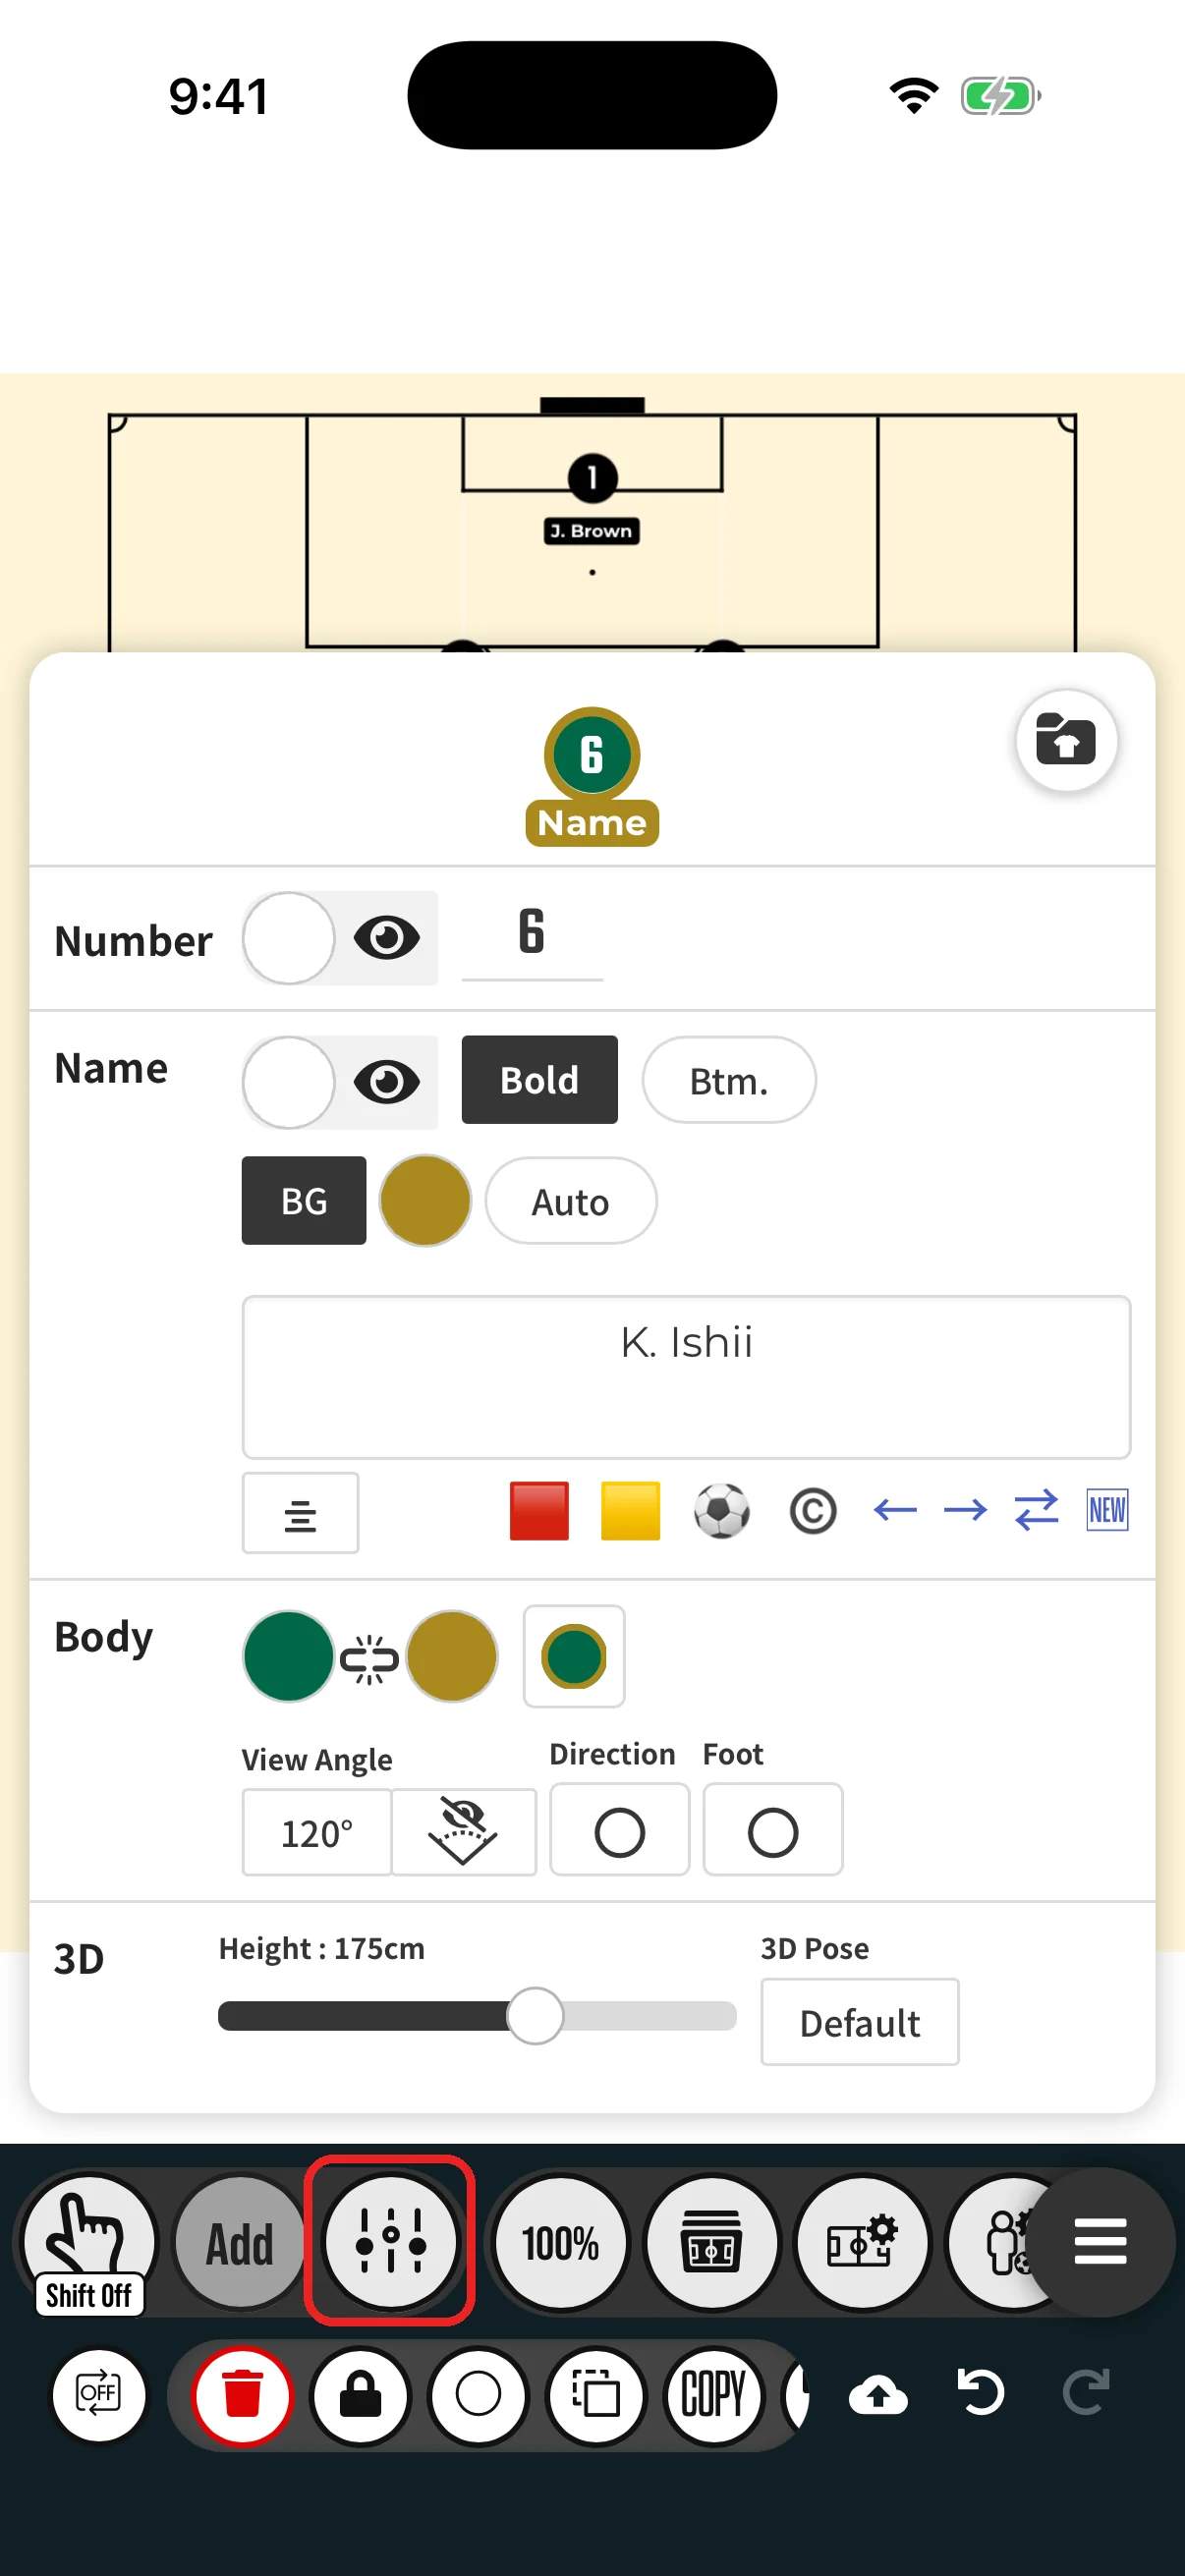
The settings are the same as the panel in the desktop version. For what each item does, see the page for each object (for example, Player Objects). Pressing the button while an add tool is chosen opens the settings of that tool. For home and away players, this changes the look of the whole team.
Setting buttons
The middle of the upper toolbar row holds buttons for board settings and views. Scroll left and right to see them all.
| Button | Description |
|---|---|
| Animation settings (animation boards only) → Animation | |
| 100% | Zoom level. Press it to open the zoom menu → Zoom and view area |
| Scenes → Scenes | |
| Field settings → Field Settings | |
| Player and ball settings, such as the selection color and ball move → Changing the selection color, Ball move | |
| Batch formation placement → Batch Formation Placement | |
| 3D | 3D view → 3D View Basics |
| Templates (Basic plan). Save the selected objects as a template and place them again later (up to 20) | |
| Export and share images and video → Export Images & Video | |
| Voronoi and Delaunay diagrams → Voronoi & Delaunay Diagrams | |
| Distance display → Display Distance |
Zoom and view area
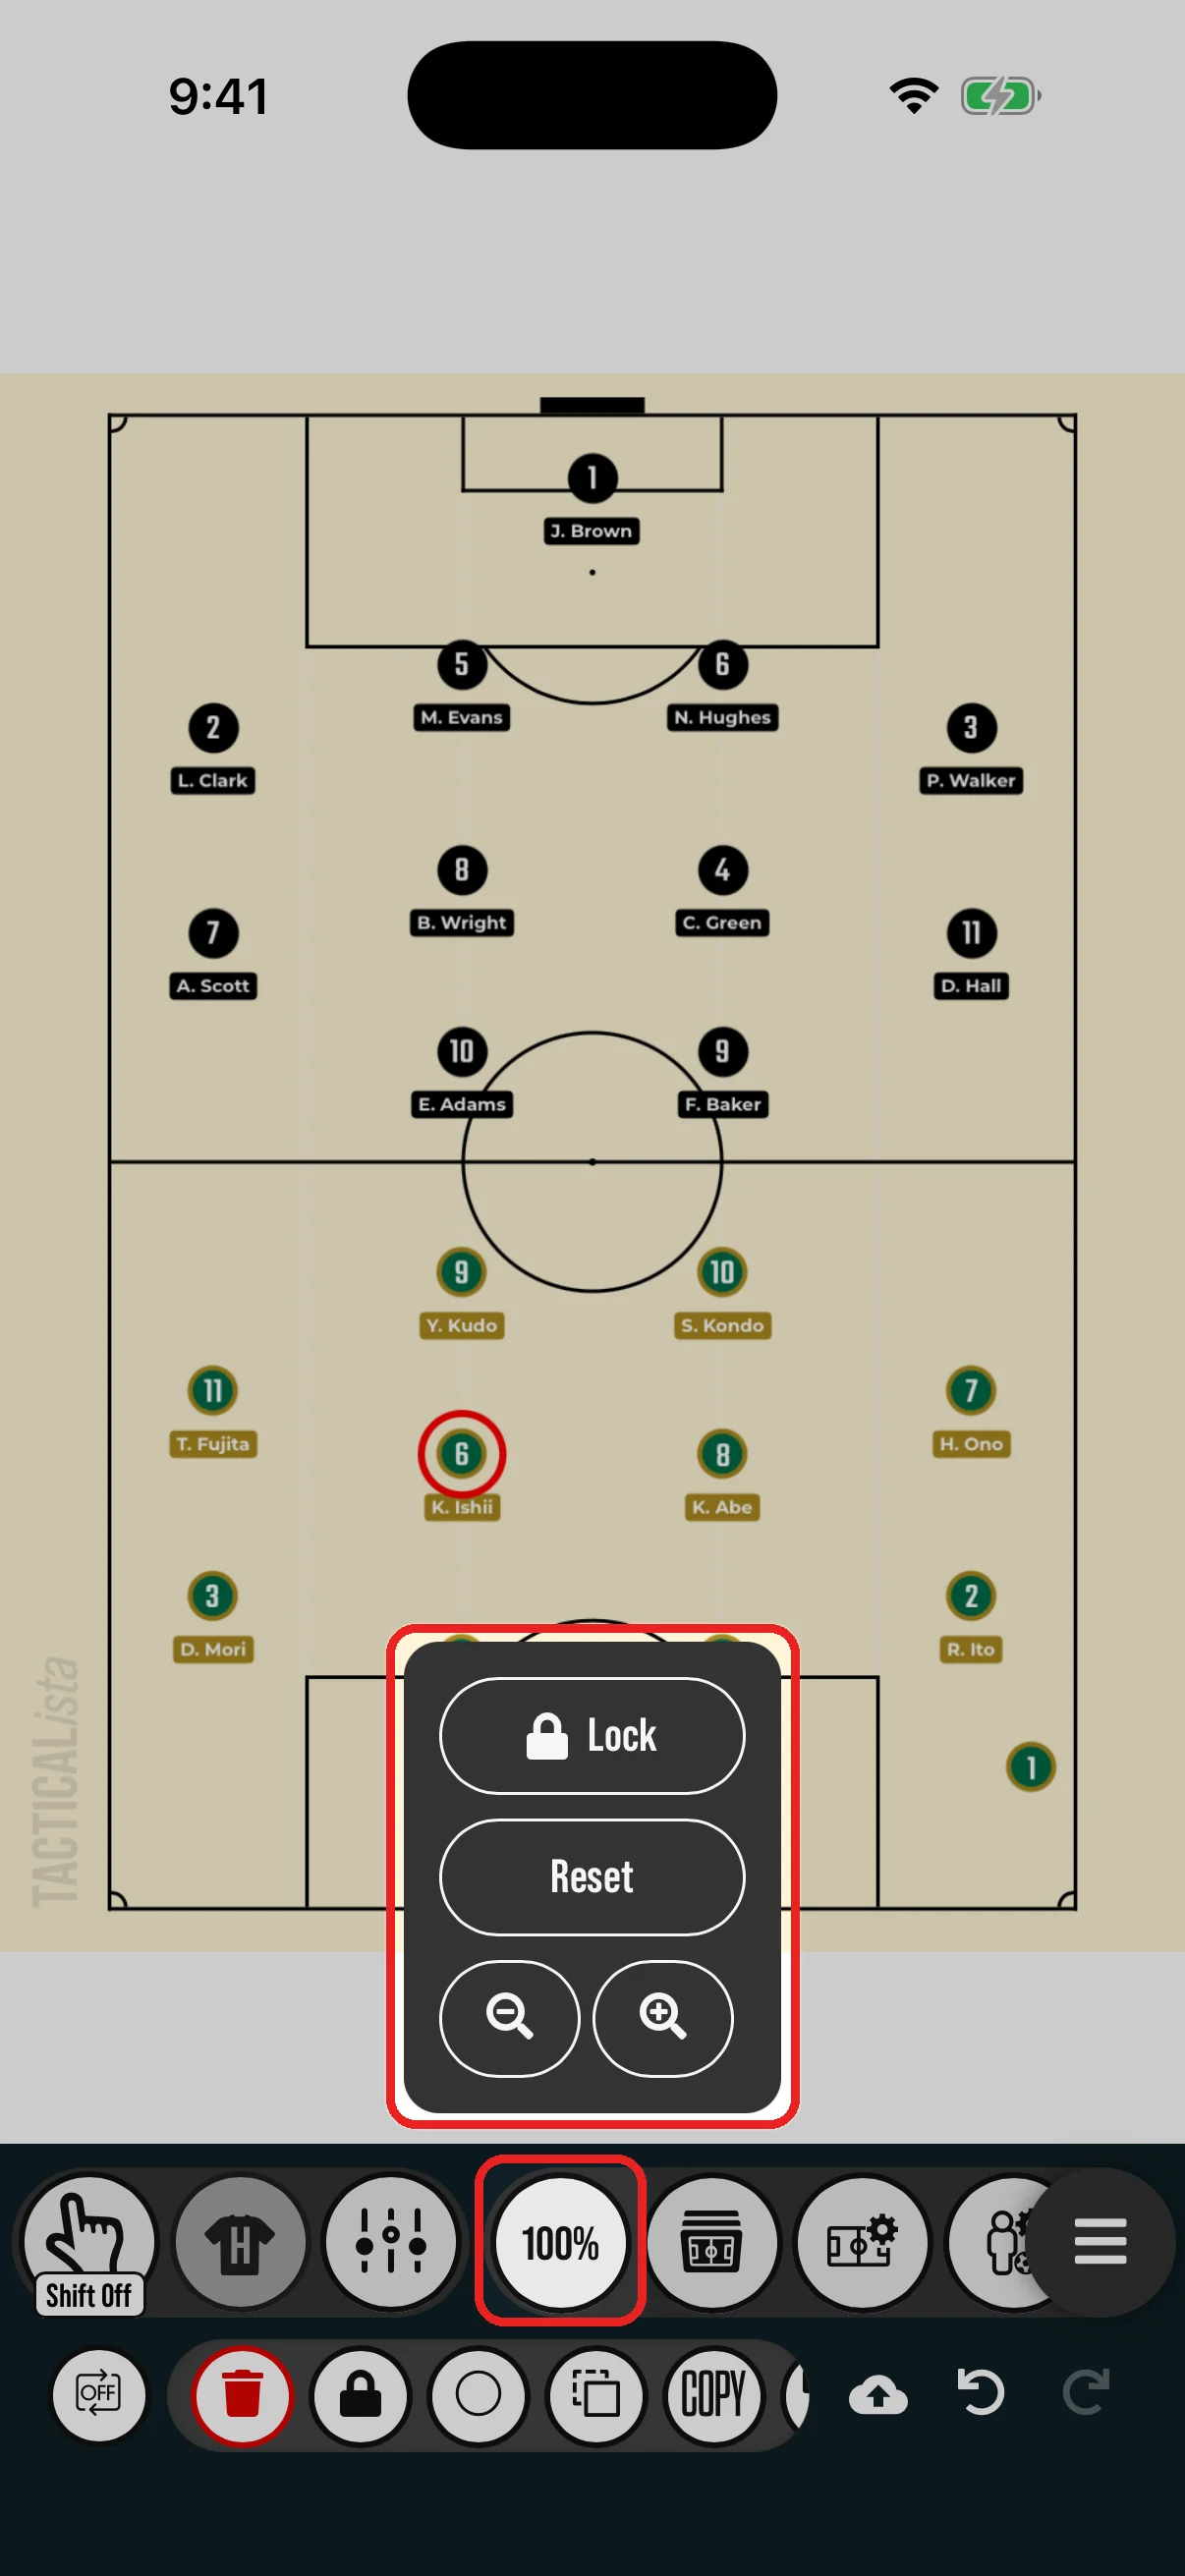
- Spread or pinch two fingers to zoom in or out.
- Slide two fingers to move the view.
- Press the zoom level (such as 100%) to show Lock (lock zoom and panning), Reset (return to the original view), zoom out, and zoom in. → Zoom and pan
Drawing by hand
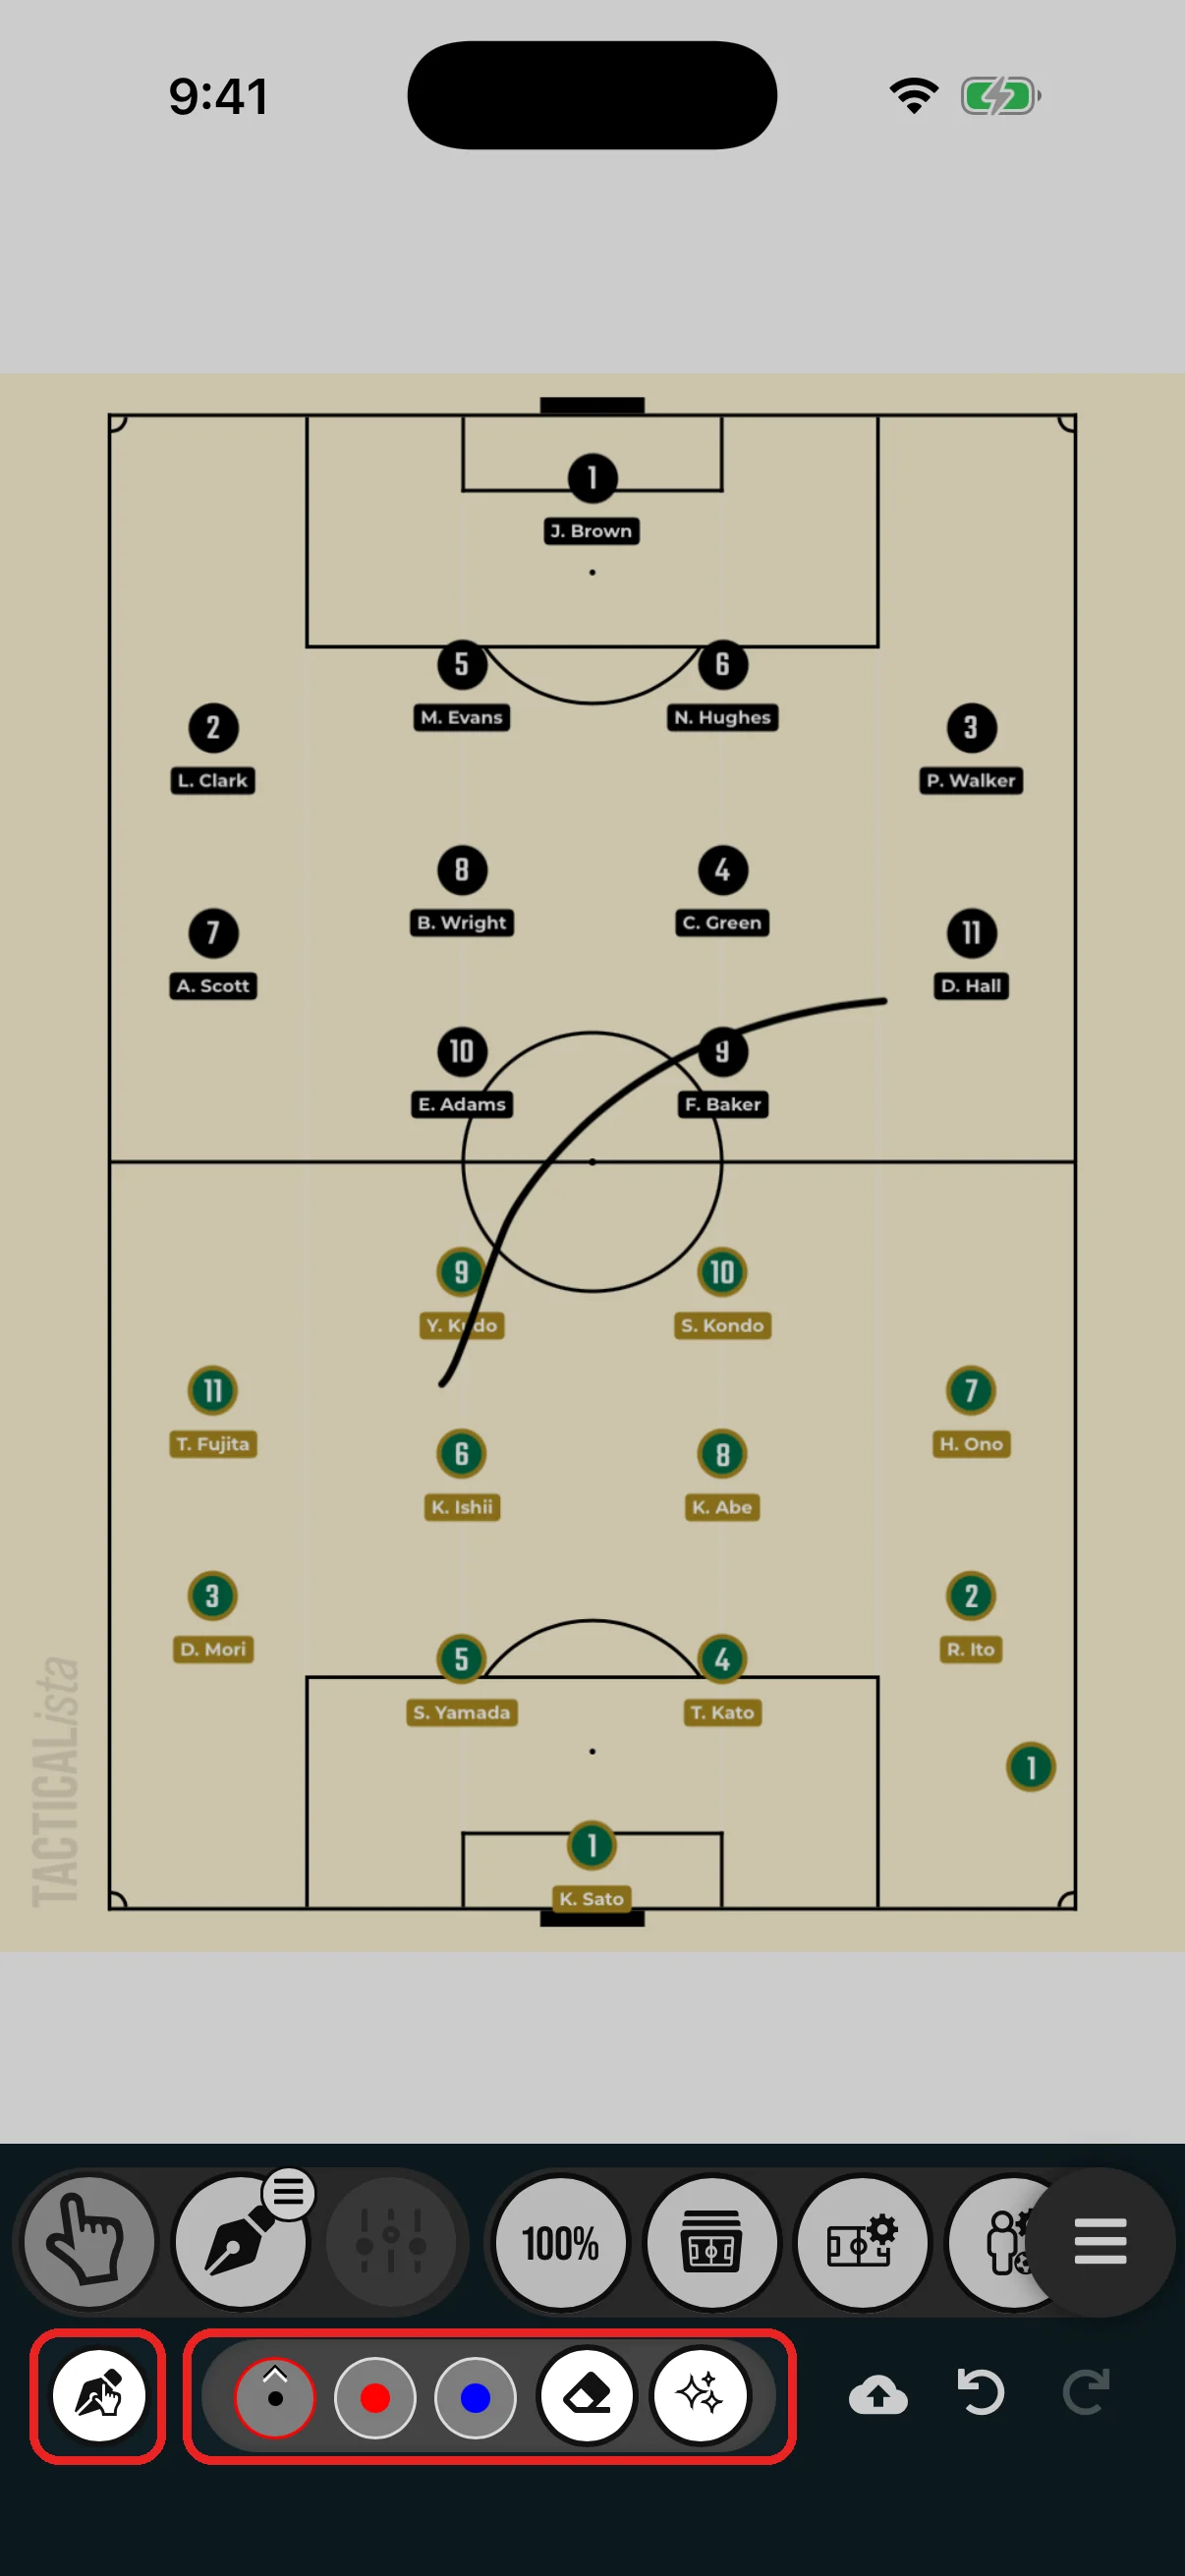
- In the middle of the lower row, choose a pen from the pen set (color and width). Use for the eraser and to delete all handwritten lines. → Handwritten Objects
- The button on the left switches between a mode that only draws and a mode where touching an object moves it . The icon on the "Add" button shows the current mode.
Animation
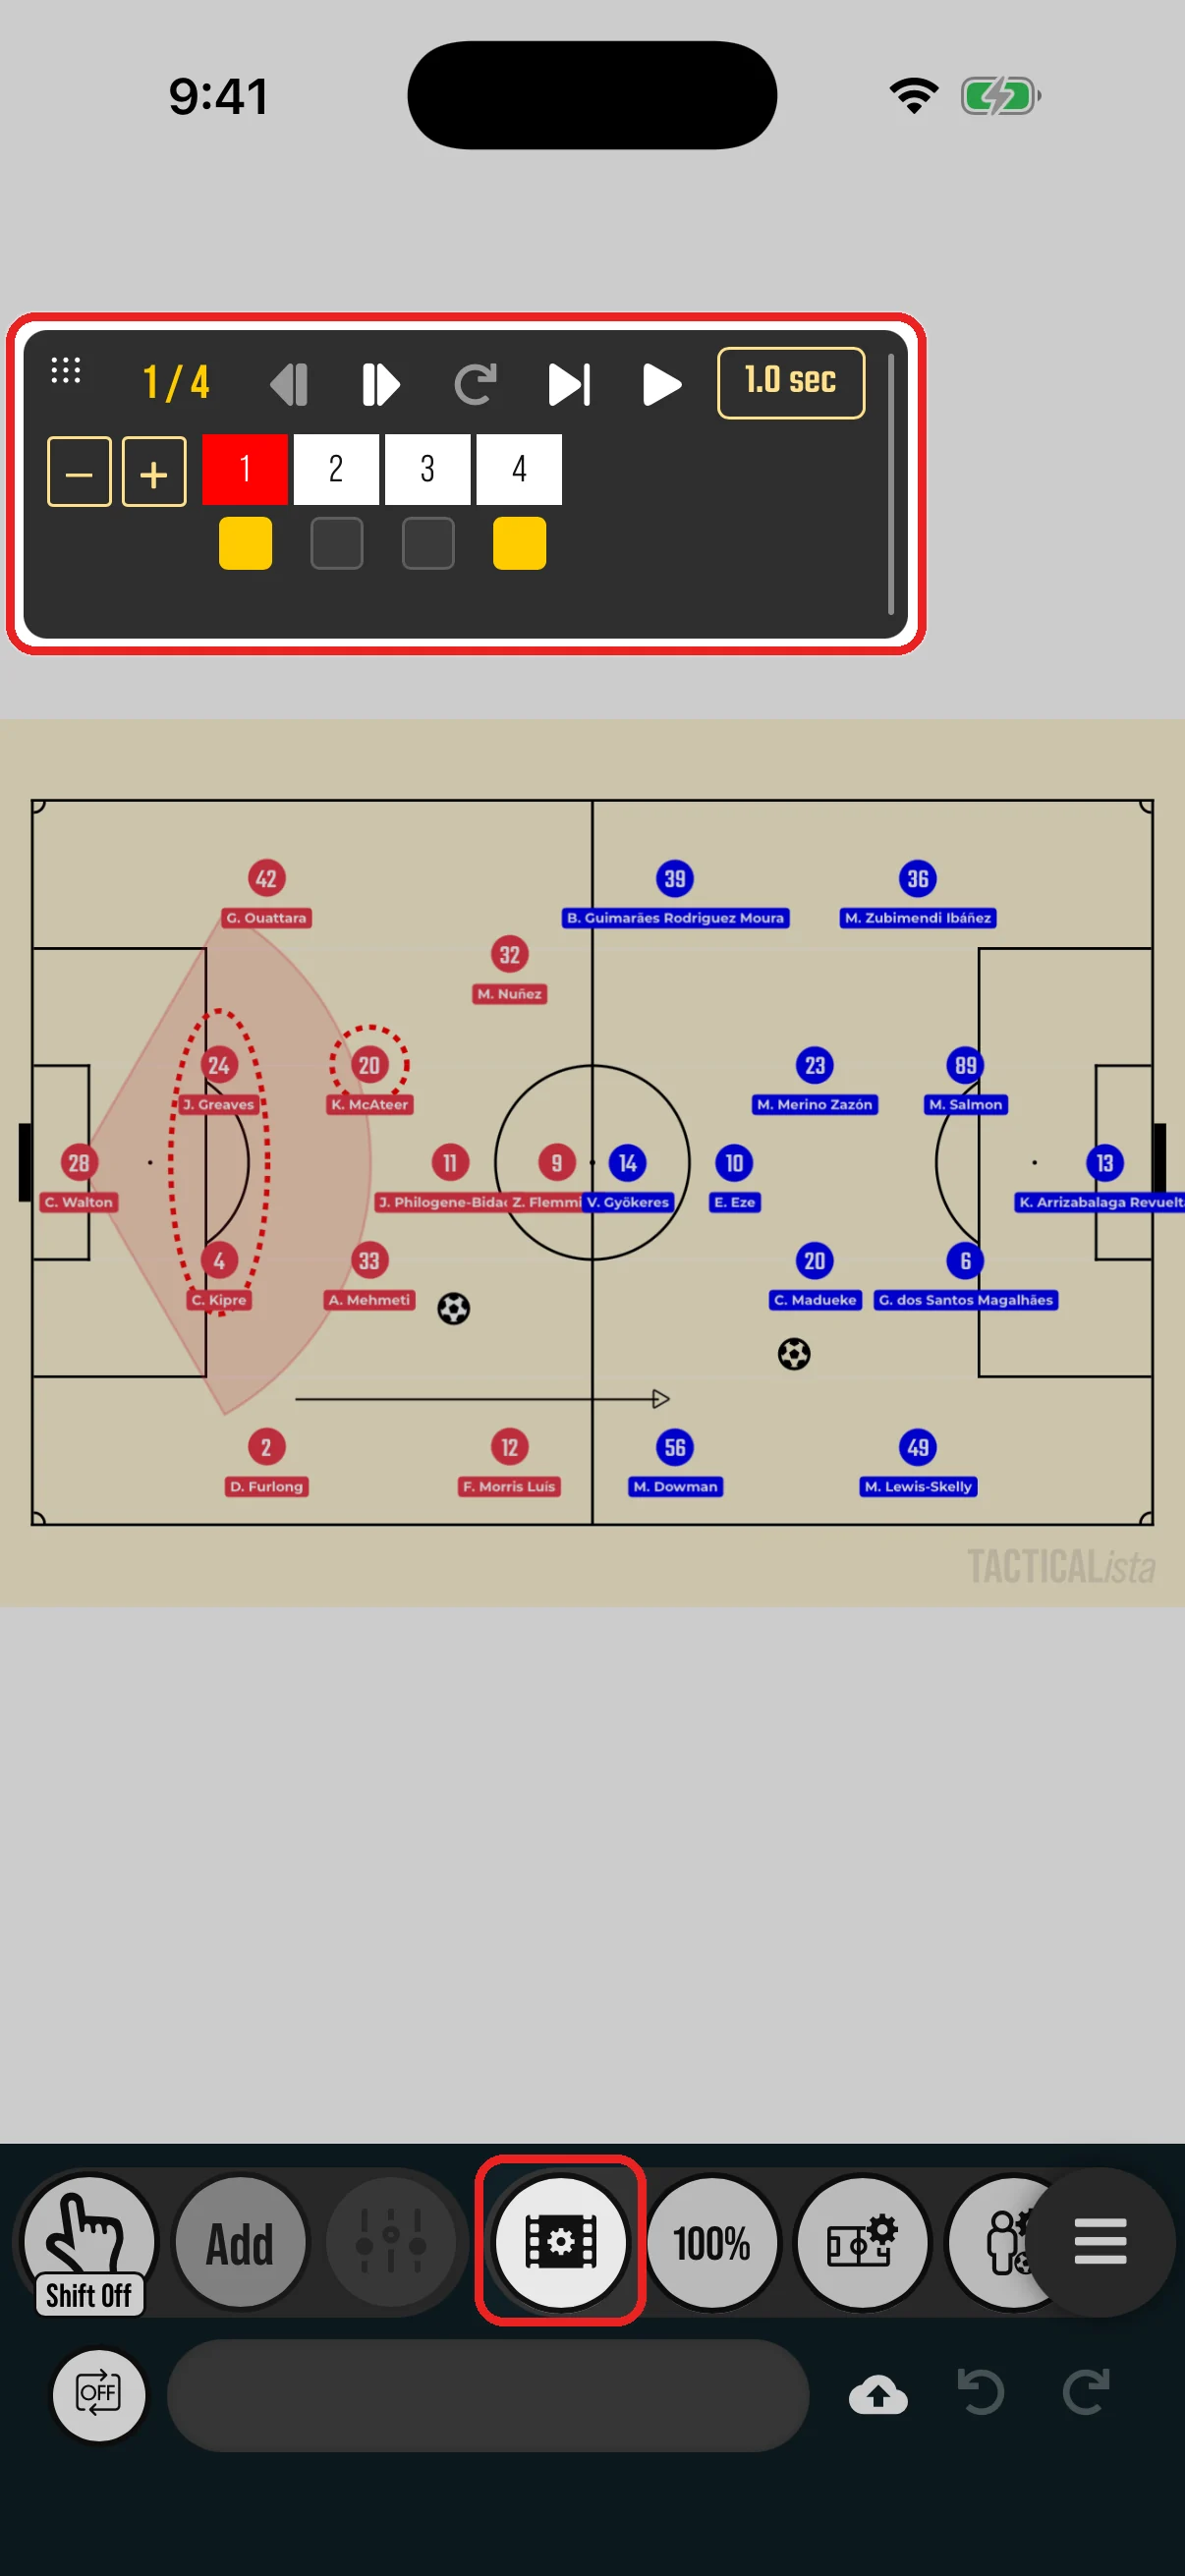
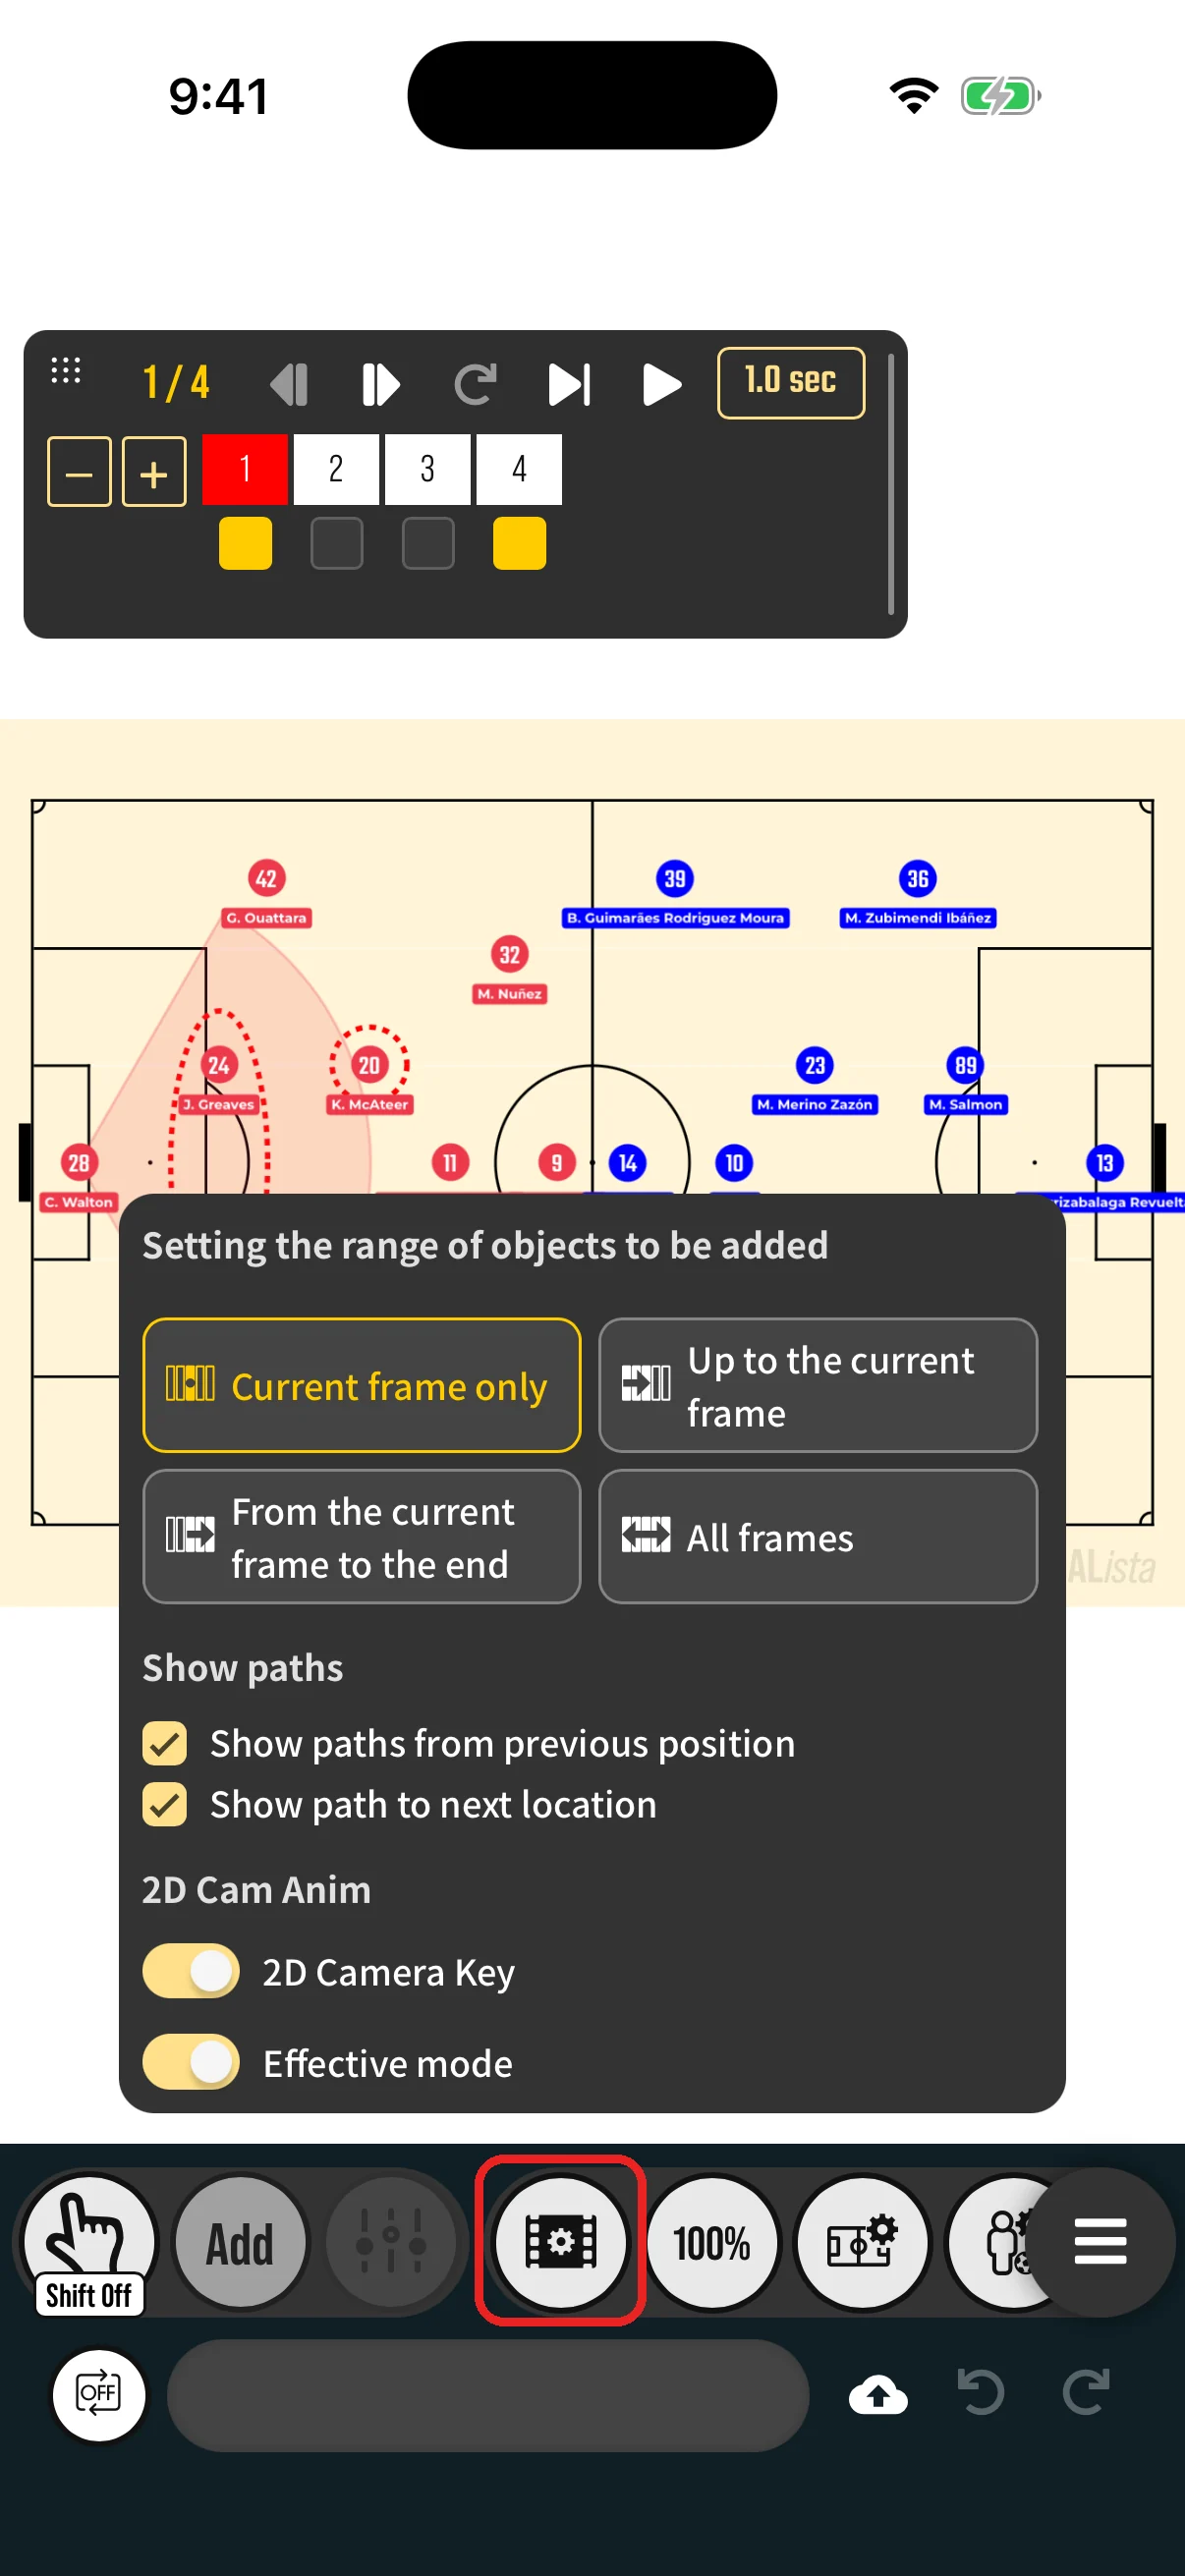
- The playback and frame buttons are the same as in the desktop version, including swapping, copying, and pasting frames from the frame popup. → Animation controller, Copying and pasting frames
- Drag at the top left to move the controller, and drag its right edge to change its width.
- sets the range of frames for new objects, the path display, 2D camera keys, Effective mode, and Play with easing.
- When you select a player or the ball, the lower row shows (Tracing a movement on the field), (Resetting a movement), / (Adding path vertices), and (Facing the direction of travel; when on).
Menu
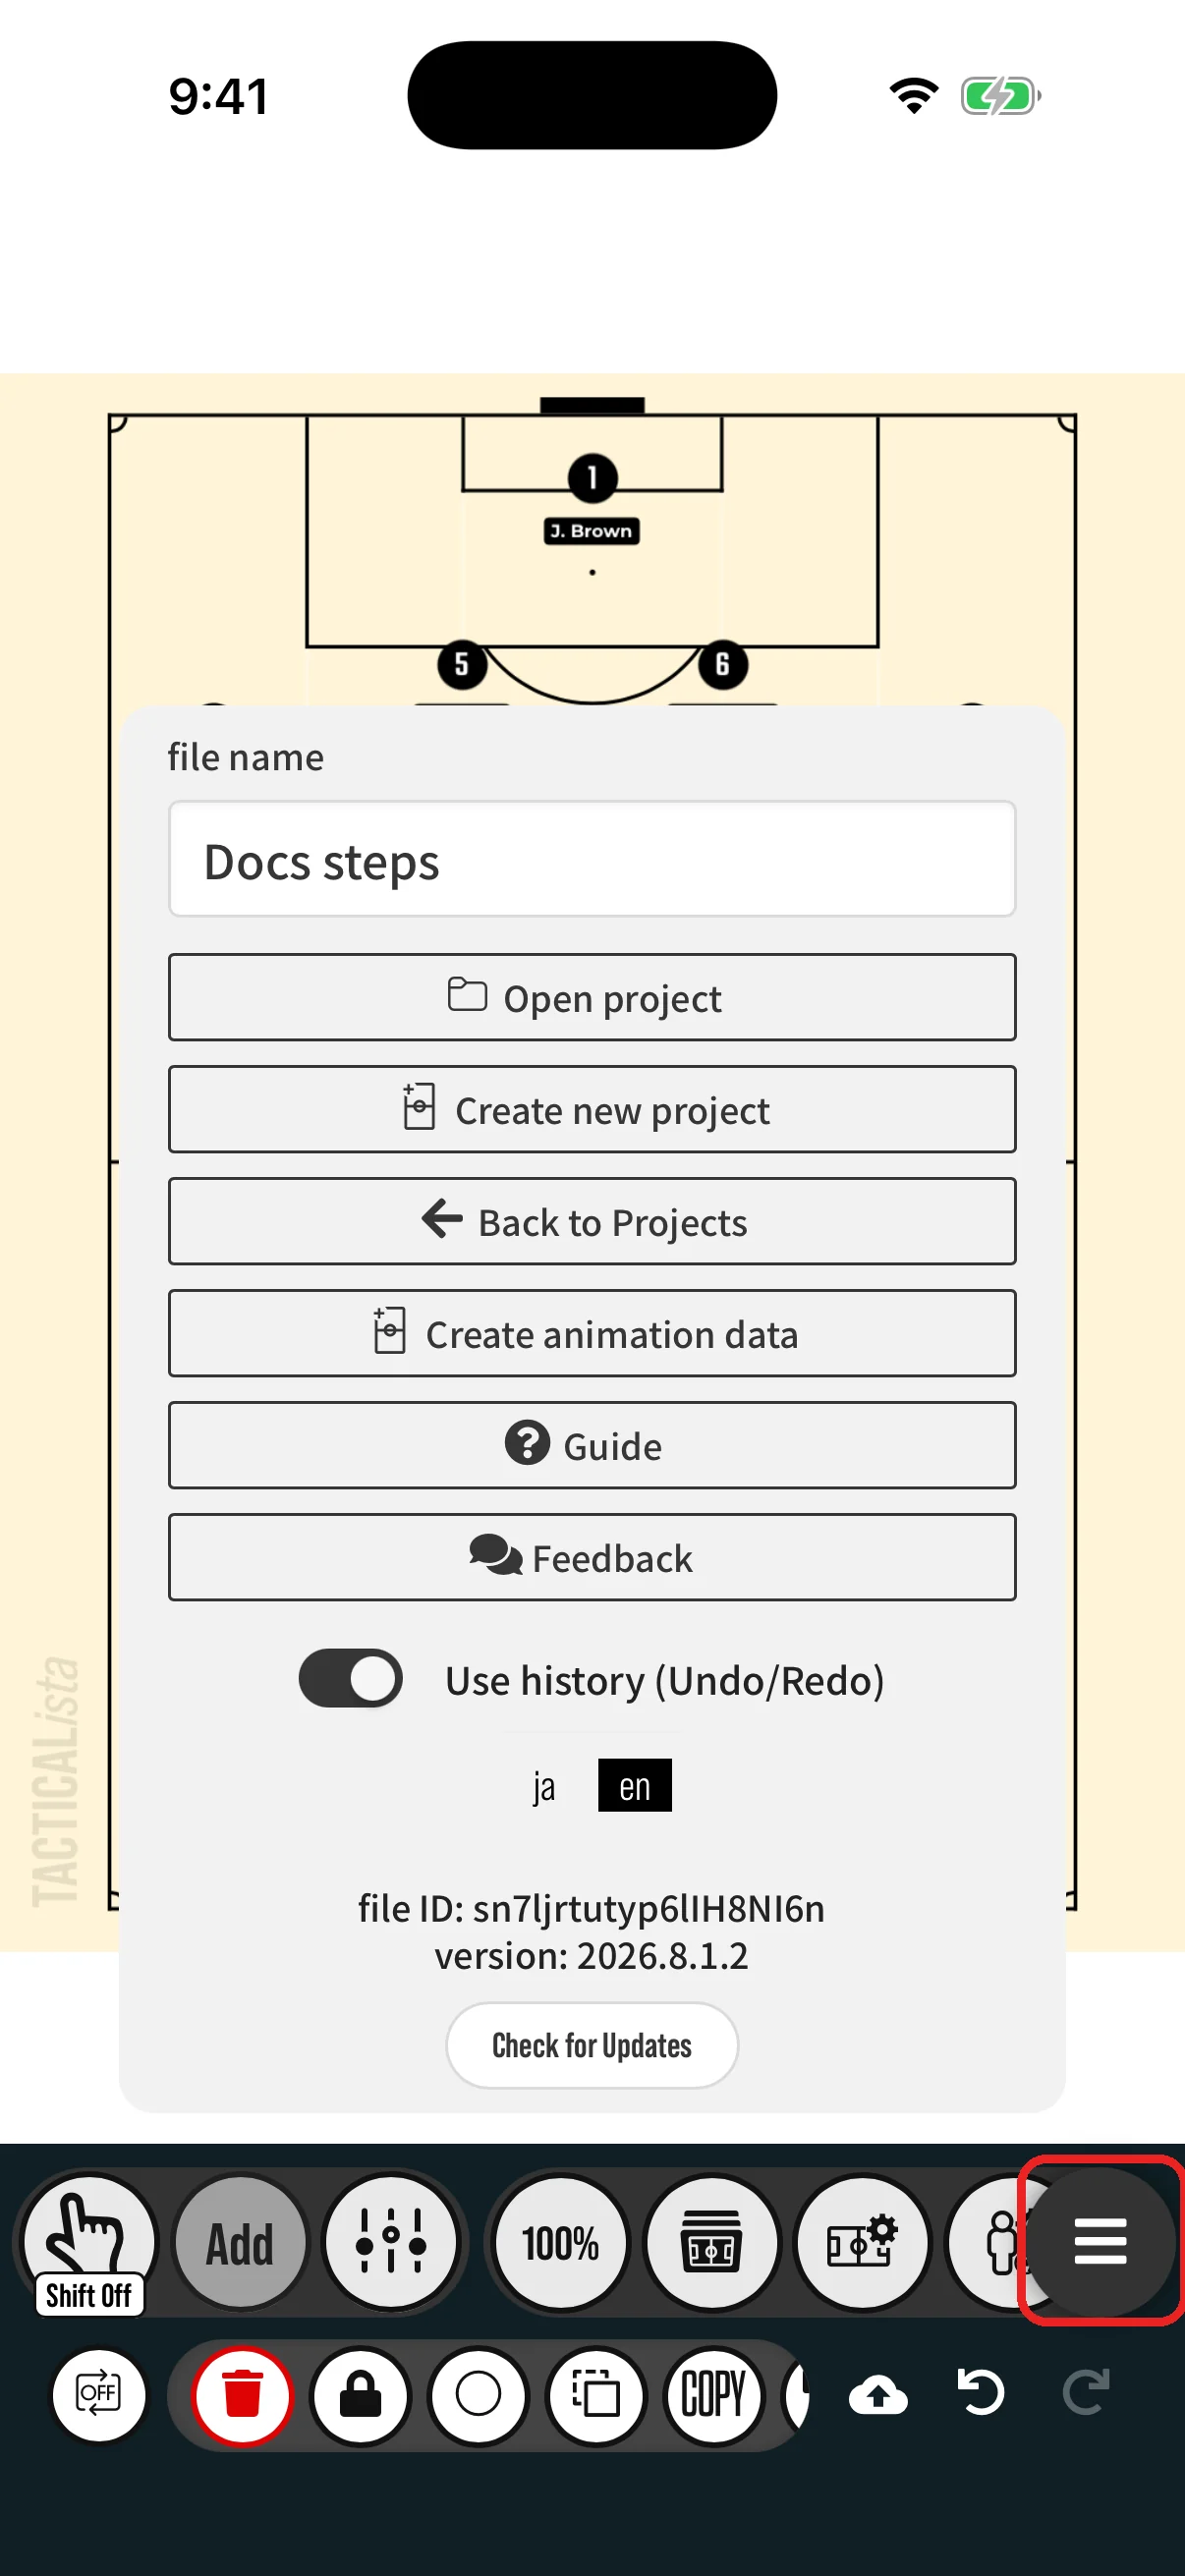
- file name: Renames the project.
- Open project / Create new project
- Back to Projects: Choose whether to save before returning or to return without saving.
- Create animation data: Creates an animation from the scenes of a static board (static boards only, Basic plan). → Animation Basics
- Guide / Feedback
- Use history (Undo/Redo): Turns undo and redo on or off. → Autosave & Restore
- ja / en: Switches the display language.
- Check for Updates: Checks whether a new version of the app is available.
Differences from the desktop version
- Keyboard shortcuts are not available. Use Shift on to select several objects.
- Importing Players from a Photo is used in the desktop editor.
- Exporting a formation image from the Team Manager is available only in the desktop version.
- The menus of the 3D view are arranged for the mobile version. → 3D View Basics